[Video tutorials] How to tie shoelaces like a master

Let’s give it a try. Learn how to tie your shoelaces in an original way. We've created 6 video tutorials for you to make sure you never leave the house with boring shoes again.
And to put the icing on the cake, we've put together some crazy facts about shoelaces for you. Do you know what the solid ends of shoelaces are called?
Why settle for ordinary shoelaces?
You don't have to knit a whole sweater out of your laces to stand out from the crowd. Just choosing a different type of shoelace makes a world of difference: swap classic white ones for something more creative. Round laces instead of flat ones, or these ones below instead of white:


How do you match colored laces to your shoes?
You can opt for contrast: put pink laces in white shoes. Or, on the contrary, blend-in style: red laces in red shoes look surprisingly unusual. Or you can match the laces with the outsole or your favorite coat or hat.

Round or flat shoelaces?
Round laces are stylish. They look different in shoes at first glance – but they also have their drawbacks. Because of the smaller contact area, they tend to come untied more often. But don't worry, we've got a tip for you below on how to tie your shoes so they won’t come undone.
We’d definitely choose flat laces for shoes made of thinner material or ones that you’ll be spending the whole day in. Round laces can cause more pressure on your feet due to their smaller surface area.

Round laces look different at first glance. But they tend to come untied.
How can shoelaces benefit you if you tie them properly?
Unusual shoelace tying is not just a matter of style. Well-tied shoes will also fit you better. For example, athletes use a method of tying laces for running called a "heel knot" to secure the foot inside the shoe. If your heel is moving around too much in your running shoes, give this a try:
- Lace the shoe up in the classic way up to the last two holes.
- Thread the shoelace from the second-to-last hole to the top hole above it. This means you’ll be sticking the lace on the right side back into the same side so that it comes out on the inside of the shoe.
- This will make a loop. Thread the shoelace from the opposite side through the loop, then tie the shoe like you normally would.
Important: Which shoes and laces do our tutorials work for?
All of the creative lace-tying tutorials we've filmed for you will work on classic sneakers with 6 holes on each side.
You’ll need 120cm laces for the sneakers.
Tutorial #1: Eights
- Start threading from the top holes. Thread the laces so they come out of the shoe through the top holes.
- Thread the right shoelace one hole down on the right side, doing so from the outside in.
- Thread the left shoelace the same way on the left side.
- Make a cross over the tongue and go out through the third hole.
- Go through the fourth hole back into the shoe and cross laces. Repeat until you get to the lowest holes.
- Cross laces over the tongue and go back through the inner side to the second-to-last hole.
- Thread the right shoelace through one hole up on the right side from the outside in.
- Thread the left shoelace through the same way on the left side.
- Finish upwards the same way you came down. In other words: Cross laces on the tongue, go out and go back in one hole higher up.
With this lacing, the lace will be threaded twice through all but the lowest holes.
Tutorial #2: Diamond
- Start with the bottom holes. Thread the laces so that they exit on the outer side of the shoe.
- Take the left shoelace and thread it on the right through the third hole from the top, doing so from outside in.
- Thread the same shoelace on the same side one hole higher, doing so from the inside out.
- Thread the same shoelace through the fifth hole on the other side from the outside in.
- Thread the same shoelace through on the same side one hole higher, doing so from the inside out.
- Thread the same shoelace through the top hole on the other side from the outside in.
- Do the same for the second shoelace.
- Tie in a bow.
Tutorial #3: The wicker basket
- Start with the bottom holes. Thread the shoelace through so that it comes out on the outer side.
- Thread the left shoelace in the classic way by criss-crossing it one hole higher. This will create two shoelace “strips” over the tongue.
- Thread the right shoelace under the bottom strip, over the top strip and into the hole from the inside.
- The lace is on the left again. Thread it through the classic way by criss-crossing it one hole higher.
- Weave the right lace in the same way by repeating step 3.
- Continue all the way up and tie in a bow.
Tutorial #4: Diamond – Version 2
- Start with the bottom holes. Thread the shoelace through so that it exits on the outer side.
- Thread the first shoelace in a criss-cross pattern, skipping every other hole. By doing so, one hole will remain free.
- Do the same with the other shoelace.
- Insert the first shoelace into the free hole from the inside. The lace will come out of the second to last hole on the outer side.
- Do the same with the other shoelace.
- Thread the first lace through the next hole from the outside in the classic criss-cross pattern.
- Do the same with the other shoelace. At the same time, you’ll go over the already-threaded lace twice, once over and once under.
- Use the same shoelace to go back down one hole, threading from the inside. The lace will be threaded through this hole twice.
- Repeat for the second shoelace.
- Thread the shoelace you’re holding in your hand in the classic way by criss-crossing it into the free hole, once again from the outside in.
- With the second shoelace, you’ll go across twice, first over, then under and into the hole from the outer side.
- Go back one hole lower again from the inside out.
- Continue the same all the way up: go back, criss-cross and weave through.
- Tie in a bow or hide the laces in the shoe.
Tip: How do you hide laces so they don’t peek out? First, tie a classic knot and bow, then hide the bow behind the tongue of the shoe.
Tutorial #5: Cross-lacing
- Start with the bottom holes. Thread the shoelace so that the ends come out on the inner side of the shoe.
- Thread the left shoelace one hole higher on the left side, doing so from the inside out.
- Thread the right shoelace through two holes higher on the right side, again from the inside out.
- Thread the left shoelace through the free hole on the opposite side from the outside in.
- Thread the right shoelace through the hole on the opposite side from the outside in.
- Thread the right shoelace through the nearest open hole on the right side, this time from the inside out so that the lace is hidden in the shoe.
- Thread the left shoelace through two holes higher on the left side, again from the inside out to hide the lace.
- Thread both laces horizontally through the hole opposite to them, doing so from the outside in.
- Keep doing the same all the way up, then tie.
Tutorial #6: Fishnet
- Start at the second-to-last holes (the second ones from the bottom). Thread the laces through so that they come out on the outer side.
- This will make a “strip” of shoelace on the tongue of the shoe. Hide it behind the tongue.
- Take the right shoelace and go back to the right bottom hole. Thread it from the inside out.
- This will create a loop. Thread the right shoelace through it towards the tongue.
- Do the same with the left shoelace.
- With the right shoelace, go across the tongue and into the fourth hole from the bottom, doing so from the outside in. This will leave the third hole free.
- Use the same shoelace to go back inside the third hole from the outside in.
- Do the same with the other shoelace.
- Repeat by threading across into the opposite hole so that one hole remains free. Then return to the free hole.
- Tie in a bow or hide the laces in the shoe.
How to clean shoelaces
Taking care of your shoelaces isn’t difficult. Cleaning them by hand is a piece of cake:
- Pull the laces out of the shoes.
- Put them in water with detergent or soap.
- Let them soak overnight.
- Pull the laces out and scrub them with a small, soft brush.
That old toothbrush you've been meaning to throw away will be perfect for the task.
Would you rather wash your shoelaces in the washing machine? The result is always a bit better when done by hand, but a washing machine can handle it too. Just put the laces in a laundry bag before washing them so they don't get caught in the washer drum or end up behind the rubber seal.
Never wash your shoes in a washing machine unless the manufacturer specifically allows for it.
Crazy trivia from the history of shoelaces
How old are shoelaces? As old as shoes are.
Or at least shoes that have survived. Historically, shoes were made of materials that easily decompose, which is why the discovery of ancient footwear is a rarity.
In 2008, archaeologists in Armenia discovered shoes that are 5,500 years old in the Areni-1 cave. And guess what? They had laces!
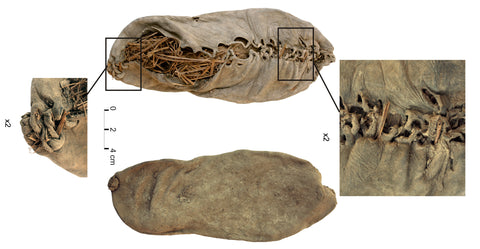
The oldest shoes in the world are 5,500 years old. The oldest shoelaces? The same age. Image source: Wikipedia.
Laces are woven today just like they were 200 years ago.
Before the Industrial Revolution, strips of leather or other material were usually used for shoelaces. But new machines made it possible to weave them on a large scale, giving rise to the "woven" ones we know today. The weaving process is still the same today, only with different materials.
Aglets – the hard ends of your shoelaces – have been around since 1790.
Did you know that the hard tip of a shoelace is called an aglet? It’s made of plastic or metal and was popularized by English inventor Harvey Kennedy. Thanks to him, we have laces that don't fray and are easy to thread.
Even crazier shoelace trivia from the present
There is a world record for tying shoelaces.
Spain's Alváro Martín Mendieta can tie 3 pairs of shoelaces into bows in 9.99 seconds. Mendieta holds other records too. Like the one for the longest ping-pong serve from 14.86 meters.
Quickly tying your shoelaces will save you a month of your life
The average person spends a whole month of net time tying their shoelaces in their lifetime. Does that seem like a lot to you? Then learn the Ian Knot. Its inventor claims it's the fastest way in the world to tie shoelaces.
There’s a person who calls himself Professor Shoelace.
This man is Ian Fieggen, the inventor of the Ian Knot. You can find everything about shoelaces on his website. But don't go there unless you have a few hours to spare.
How do you tie shoelaces so they won’t come undone? Just a slight adjustment is enough.
According to "Professor Shoelace" Ian Fieggen, all you have to do is tie the foundation knot in the opposite way than you’re used to. When you keep tying it on the same side, you’re tying the bow in the same way and the result is unstable. Switch sides when tying your knot and you're good to go.
Teach this safe lace-tying method to your children. It's a small thing that will keep them from stepping on their laces and falling down.
You can do it without lacing the laces
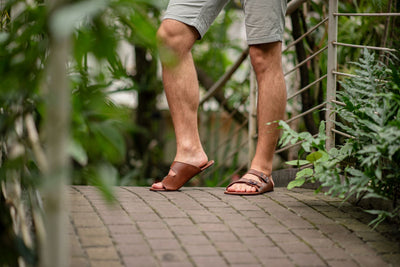
You already know you'll spend a month of your life tying your shoelaces. What about going on vacation instead? Check out the new spring and summer slip-on sneakers that you can just slip into.


Other interesting articles